How to Handle Damaged Freight: A Guide

Damaged Freight
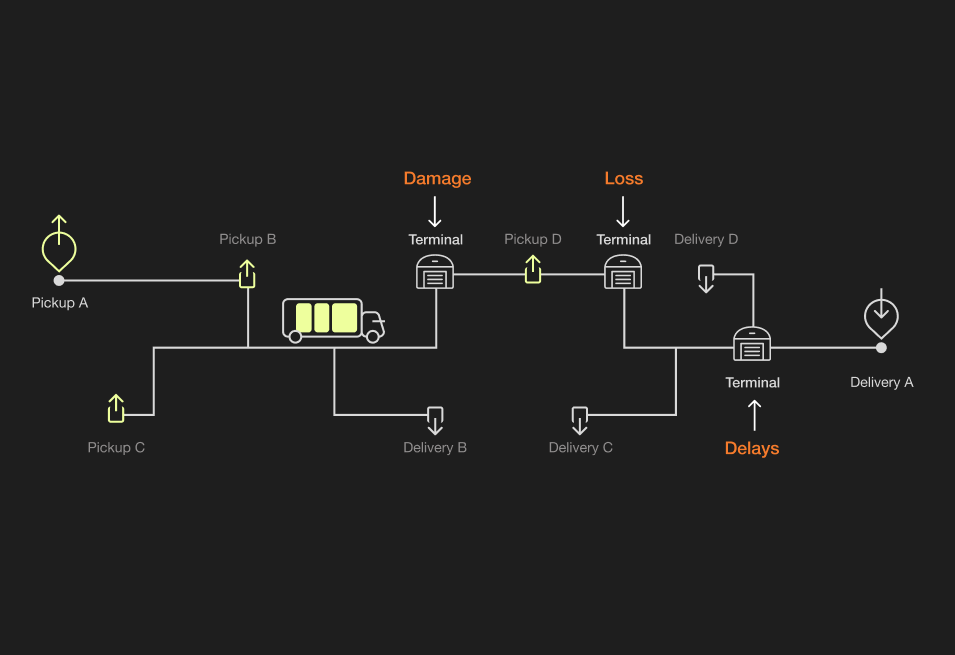
If you are working in the world of e-commerce, it’s likely you are sending hundreds, if not thousands of shipments out every year. As these shipments cross the country or circumnavigate the globe, they inevitably run the risk of being damaged somewhere along their journey. This likelihood of a package incurring damage will increase for longer routes and for those shipments that require more handling due to liability issues, or that need to be delivered to underutilized lanes, which might include an item transfer to another truck, or multiple trucks, in order to reach its intended destination. Although carriers and manufacturers do their best to minimize damages, wear and tear is an inevitable aspect of the shipping industry, especially since one must always account for human error. While there is a big difference between some general wear and tear and truly damaged goods, you should expect both issues to crop up from time to time. Ideally, every package you send or receive would come pristine, but alas, we live in an imperfect world. Because of this, if you receive a damaged item or freight that is clearly broken or marred, there is a right way to handle the situation and a wrong way. The wrong way is to freak out, throw a hissy fit, and immediately play the blame game. That does not get anything productive done, nor does it make the carrier want to help you fix this problem. Finger pointing rarely yields positive results, particularly when it comes to business relationships. Damaged freight is an inevitability, so treat it accordingly; obviously, this is a frustrating situation, but the world is not ending. If you remain even-keeled, document everything and follow the steps below, you will drastically increase your chances of arriving at your desired result.
Step 1: Do not turn the driver away!
As mentioned, dealing with damaged freight comes part and parcel with the business, and you will eventually face a situation where you have to decide on whether or not to sign for the damaged goods or to refuse them. Now, it is a completely understandable reaction to wave your hands and say, "I want nothing to do with the situation. It was broken before it got here. I do not want to deal with this. This is your problem." Although that is how most of us would deal with any regular type of delivery gone awry, when it comes to carriers and freight contracts, you can not treat them like a pizza delivery guy. Refusing to take the goods in this situation will likely only cost you even more money in the long run, since you could be on the line for further shipping costs. Do not turn the driver away, instead, as counter-intuitive as it might seem, accept the freight, damages and all.
Step 2: Accept the damaged goods
Now, again, you might feel like railing against such an absurd notion, but, if you accept the damages, thoroughly document the specifics, and then file a claim, you will likely be duly recompensed. Various factors can determine whether it was the fault of the original shipper, such as cases of poor or inadequate packaging, or if the harm occurred during the carrier's haul, they will be found at fault and will have insurance to cover such losses.Consider what happens if you do not accept the damaged freight. The carrier will likely have to send it back to their warehouse and store it as the claim is processed. Although some carriers may be agreeable to doing this, it could hurt you in the long run since you are on the hook for refusing to accept the freight and as a result have to pay storage and processing fees. Further, giving the damaged freight back to the carrier does not incentivize them to take care of them. As a result, the already damaged goods may be more predisposed to encounter even more damage at the hands of the carrier. In other words, by washing your hands clean of the whole ordeal, you lose control of both the goods and the situation. It is important to keep in mind that if you utilize a third-party insurance policy outside of the carrier, that policy may have clauses that nullify their responsibility to pay if you refuse the freight. Most insurance policies require that you accept the freight, take pictures, or even have an inspector come and verify the damage in person. Refusing to accept, only hurts you in the long run.
Step 3: Document everything
After accepting the damaged freight, you should immediately act and make a note of any shortages or damages on the Bill of Lading (BOL) or proof of delivery (POD) provided by the carrier. If there are any exceptions, those too should be noted. An exception does not require a claim; however, if there are no exceptions pointed out in the BOL or POD, your claim rep will face a difficult challenge in collecting on the claim. An example of such an exemption is, "Two of the boxes are dented." But if the product inside the boxes remained unharmed, there would be no need to file a claim. While there are cases in the LTL industry where provisions are made for unseen damages, or those that are not apparent on first glance, they are hard to win, especially without noting any issues immediately.The Bill of Lading acts as the carriage contract between the carrier and the shipper. Although most claims contracts will rely on U.S.C 14706 as the standard for resolving claims disputes, freight claim laws differ on a state by state basis. Moreover, if you ship or operate in Mexico or Canada, the laws are dramatically different when crossing the northern or southern borders. In almost every case, the point of origin will inevitably dictate the legal jurisdiction that presides over the claim. For example, for a freight shipment that is taken from Mexico and intended to be delivered to Canada and is damaged or lost along the way, Mexican claims laws will be used in the resolution process. Dragging documentation out, or putting off the filing of a claim like you would paying a parking ticket is a bad idea. The longer you wait, the weaker your case. Not to mention the longer your customer will have to wait for their undamaged goods. Especially in this day and age, that is just about the quickest way to lose a customer. So, note the problem on the Bill of Lading and be detailed, very detailed. Note, date and label everything. After that, take pictures of the damaged goods. Make sure they are clear, well lit, and support your claims. Once you have taken pictures, reach out to your carrier or freight logistics company to let them know there was freight that was delivered in an unsatisfactory condition. Carriers have a legal right to mitigate the value of their claim. This can be done by allowing them to re-deliver, salvage, or return the goods, but if you do not give them that opportunity to recoup or mitigate loss, they may have legal grounds to deny your claim. Generally, you have two weeks to file a damaged freight claim. Now, some carriers may allow for longer claim times, or utilize different tech to prevent missing freight, regardless, the moment you realize goods are damaged or lost, alert your carrier. Remember, carriers almost never automatically file damaged freight claims. It is your responsibility to follow up on that, not theirs. An unannotated BOL is basically a receipt that acknowledges that freight was delivered and in good condition. A BOL is regularly used as proof of undamaged delivery, so, fill it out and then contact the claims department for additional paperwork.
Step 4: Keep the freight (and Packaging)
While it may be a pain to store the damaged freight, it is vital that you do so. Be sure not to throw it away or store it somewhere, forget about it and lose it. As mentioned, the carrier has the right to inspect the damage in person and has the right to salvage the damaged freight. Disallowing them that opportunity could mean the claim is not fully paid or denied outright. However, in the cases of goods that do not keep or spoil such as food or hazardous materials, outside disposal laws may supersede a carrier's salvage rights. That said, they do have to be notified first, so they have the opportunity to act.
Step 5: Prevent further damage to freight
Each party has a responsibility to do whatever they possibly can to mitigate potential damages to freight, but there is quite a bit of legal wiggle room when it comes to how much any party actually knows when it comes to ways that the cargo is being damaged. So, store the goods in a safe place and do everything in your power to keep them from undergoing further damage. Once it has found a good spot, leave it there. Do not put it somewhere in the way, where it may be regularly moved or shifted. By reducing the amount of handling, you decrease the odds of further damage being incurred.Another way to prevent freight damage is by shipping shared truckload. By pooling your LTL shipments with other freight onto a shared truckload, your shipment skips all hubs and terminals, arriving safely, every time.
Step 6: Pay the charges
Just as there is a claim valuation timeline, there are also requirements that claims be filed along with a copy of the paid freight bill. If you do not pay the freight bill, regardless of who is at fault, that can hurt your claims resolution. By paying the freight bill immediately, you display good faith. It may be upsetting or seem unjust, but it is the wisest route and the one that is most likely to end with you getting every single cent back.
Step 7: File the freight claim immediately
As with documentation, filing the freight claim should be done posthaste. According to the Carmack Amendment that deals with damaged freight, a carrier within the United States has to acknowledge a claim within a month of the initial filing. After that, a final disposition has to be handed over in writing within a three-month period. Following that, the claimant will have two years to dispute the disposition. If you file a claim after the initial claim period, that claim will be automatically voided.
Step 8: Freight Claim Maximum Liability Amounts
Within Canada and Mexico, a carrier is responsible for a permanent dollar per pound rate, that is, unless the two parties had a prior agreement on a higher rate. Within Mexico, the fixed rate is 2.8 ¢/lbs and within Canada, the rate is $2 CAN/lbs. Within the U.S., if found liable, the carrier is responsible for the actual value of the lost or damaged freight.
Step 9: Do not forget to keep copies of everything!
Fill out this checklist, do you have:
- A copy of the Bill of Lading
- A copy of the paid freight bill
- A copy of the invoice that shows the price paid for the damaged goods
- A copy of the packing slip
- A standard claim form or a letter identifying the shipment and the claim amount.
- Copies of photos of the damage
Once you have all of these documents, put them in a labeled folder and store it somewhere that is both secure and at hand. By having an overabundance of evidence readily available, you only serve to strengthen your claim.
Conclusion
When you inevitably receive damaged freight, you will likely be annoyed, if not upset, but those feelings of frustration should not impede your actions. You will have a significant choice to make--sign for the goods, or refuse them. To put it lightly, refusing them would be foolhardy and likely mean you take a loss on those goods. Instead, take the goods into your procession, document everything and file your claim as soon as possible. Improper management of your freight claims can cost you both time and money, so be sure that you know how the claims process works and what your contract with your carrier says to do. Follow the steps above, and you will be well on your way to resolving the situation in a manner that is as productive and stress-free as humanly possible.